Sunday 25 October 2015

Final Character Brief

After planning and brain-storming ideas I have managed to come up with my final idea and backstory for my burnt mark wound.
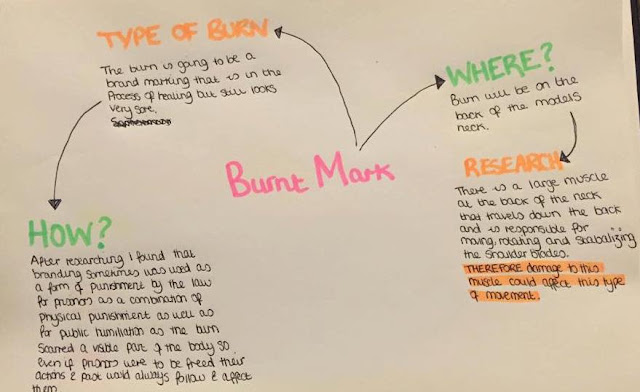
I have decided to take in to account the research I found and have the burnt mark on the back of neck as a branding mark. The character will be a prisoner, this will be represented through an orange jumpsuit. The hair will be loose and messy and the makeup will make the model look pale, tired and withdrawn as if they have been tortured, reinforcing the idea of having been branded as a method of physical torture and embarrassment. The branding mark will be made up of 3 numbers (935) as if a form of identification of the prisoner.
I am going to take 2 images for this part of the project, the first will be a close up of the prosthetic on the models neck to capture the fully finished prosthetic, and the second will be a character shot where I will have the model posing facing the back with their head turned slightly to see their face but still so the branding can be seen. She will be holding her hair up and looking through the gap in her arm. 


https://www.pinterest.com/pin/260505159669111848/

Planning


The Anatomy of the Neck


As part of my idea for my burnt mark I have decided to place it on the neck. Therefore in order to understand exactly how the burn would look on the surrounding tissue I did some research into the anatomy of the neck. 
The muscle surrounding the area of the burnt mark on the back of the neck is called the 'Trapezius'. This muscle travels down the back of the neck and the shoulder blades and is responsible for moving, rotating and stabalising the shoulder blades.  
This kind of information will influence the appearance of the scar than if it was somewhere with less muscle and closer to the bone. The skin will wrinkle less on the neck than it would on other places, like the hands for example.


http://teachmeanatomy.info/neck/areas/posterior-triangle/

Researching Burns

When I researched the definition for 'Burn' this is what I found:
"A burn is a type of injury to flesh or skin caused by heat, electricity, chemicals, friction, or radiation. Burns that affect only the superficial skin are known as first-degree burns. When the damage penetrates into some of the underlying layers, it is a partial-thickness or second-degree burn"

Baring this in mind I began to google images of different burns to gather some ideas for what type of burn I wanted to create. I wanted to gather images of burns over various parts of the body to see what type I'd like to create the most.

The images below are pictures courtesy of google, and are a variety of images of recent burns. There is a mixture of first and second-degree burns. These burns are very pink, red and orange in colour, some show traces of blood but all of them look very sore and angry.
If I were to create a fresh burn for my wound then I would need to consider adapting these colours in to my final piece as well as using substances such as fake blood and perhaps fake puss?  


The images below are of burns that are drying out and healing or have healed and scarred. The burn scars are a different texture and appearance to the surrounding skin, they are a lot paler in colour and look a lot smoother than the normal, unaffected skin. The burns that are in the process of healing, however, are a deeper red colour and the skin looks very dry. If I were to create this type of burn I would need to consider how I would create this type of appearance of the skin and what colours I would need.


Images courtesy of Google Images; 
http://asianetindia.com/home-remedies-to-remove-burn-marks/, 
https://en.wikipedia.org/wiki/Radiation_burn, http://www.medicinenet.com/dehydration_pictures_slideshow/article.htm, 
http://cdn.lifeinthefastlane.com/wp-content/uploads/2010/06/Picture_16681-590x391.jpg, http://f.tqn.com/y/firstaid/1/9/l/D/-/-/KathrynHarper2ndBurnArm.jpg, 
http://file2.answcdn.com/answ-cld/image/upload/w_760,c_fill,g_faces:center,q_60/v1/tk/view/answ-images/00eaac80/7589060750a247e875c000f4db47f7153e30db74.jpg, 
http://www.indiatvnews.com/news/india/shiv-sena-activists-disrupt-pak-sufi-band-press-conference-33242.html, 
http://www.vicburns.org.au/first-aid/cover-the-burn.html, 
http://www.gutefrage.net/frage/die-zahl-269-eingebrannt-welche-bedeutung, 
http://ocvalidate.imngmedicalmedia.com/onecount/redirects/index.php?action=get-tokens&return=http%3A%2F%2F
www.familypracticenews.com%2Fsearch%2Fsearch-single-view%2Fburn-wound-dressing-speeds-recovery-and-reduces-complications-costs%2F46535147a1.html, 
http://pixhder.com/2nd+degree+burns+treatment+healing?image=1422899670


My Wound Type


The wound type I was assigned was a 'burnt mark'. 
Therefore I will need to research; 
- Different types of burns
- How different types of burns vary in colour
- How burns look throughout different stages (e.g. a fresh burn, a healing burn, a burn scar)
- How the burn was created in the first place (i.e. the characters back story)
- Why the burn was created


Applying a Prosthetic - Technical Folder

1. Remove the prosthetic from the mould using talc and gently easing it out, teasing the edges of the super-baldiez layer.

2. Using a cotton bud carefully apply pros-aide, a contact adhesive, to the bottom of the prosthetic (the part that will be flat against the skin) and also to the area of skin on the model you wish to place the prosthetic. 

3. Wait for the pros-aide to turn clear (you can use a hairdryer in a cool setting to speed this process up) and then apply the prosthetic to the chosen area of the body, pressing down firmly to maximise how secure the prosthetic is but making sure the edges don't fold or curl. 

4. Once you are happy with how secure the piece is, clean up and blend the edges using alcohol with a firm outwards motion. The layer of super-baldiez should melt evenly in to the skin, helping the piece to look more like part of the models real skin. 

5. Once you are happy with how the piece is blended you can begin making up the prosthetic however you wish.

*to remove the prosthetic use pro-clean cleansing oil, easing the piece off with the help of a cotton bud if required. 

Making a Prosthetic - Technical Folder

1. Make a mould of the prosthetic out of the moulding clay using the sculpting tools on to a flat plastic surface (you can use a hairdryer to apply heat to the clay to make it softer and easier to mould if necessary). 

2. Spray the mould with fixing spray and petrolease (hold the sprays approx 20cm away from the mould) if possible out a window or in a well ventilated area to prevent a build up of fumes. 

WEAR A MASK TO PREVENT YOURSELF FROM INHALING ANY FUMES.

3. Make a barrier around the mould that will be capable of holding the mixture to make your final mould ( you can do this by cutting the bottom off a plastic cup or if the piece is quite big you can also use moulding clay to create a wall around the prosthetic mould). Secure and fill in any possible gaps using a glue gun. 

4. Whilst this is setting, cover your surface with cling film and begin measuring out equal amounts of plastil gels A and B using a scale and separate labelled lollipop sticks (label one A and the other B). Depending on how big your prosthetic piece is will depend on how much of each gel you will need (for example 30ml of plastil A and 30ml of plastil B for a small piece) to cover the entire sculpture. 

WHEN MEASURING THE DIFFERENT PLASTIL GELS USE A SEPERATE SET OF GLOVES FOR HANDLING A AND B. 

5. Carefully mix the two gels together, ensuring there are as few air bubbles as possible, then carefully pour the mixture into the clay mould evenly, leaving it to set for anywhere between 45 to 90 minutes.

6. Once this has set, slowly ease the new mould out of the clay and, using alcohol-isopropyl and a cotton pad, carefully wipe over and clean any residue or dirt (e.g. Pieces of moulding clay) until your new mould is completely clean. 

7. Using the proportions 2:1 mix together alcohol and super-baldiez (e.g. If you use 30ml of alcohol then use just 15ml of the super-baldiez). 

8. Spray the mould with petrolease (again if possible in a well ventilated area) and, once dry, take one of the wooden laminating brushes and apply 2-3 layers of the mixture over the prosthetic, leaving each layer to dry completely before applying the next (you can speed this process up by using a cool hairdryer) 

9. Once this had all dried mix together equal amounts of plastil gels A and B and then in addition to this, mix in 60-75% (of A and B's total amount) of plastil deadener (e.g. 30ml of A, 30ml of B so 38-45ml of D)

REMEMBER TO USE SEPERATE, LABELLED STICKS TO MEASURE OUT THE GELS (A, B & D)

10. Being quick to ensure the mixture doesn't set, select the pigment you wish to colour the mixture and add a small drop to the mixed together gels. Adding the smallest drop and stirring will spread the pigment until eventually the whole mixture is an even colour. 

11. Carefully pour this mixture into your mould evenly, making sure to cover all parts of the sculpture. 

12. Then take a flat/straight edge (eg. A ruler) and lightly drag it across the top of the prosthetic, getting rid of any excess mixture and flattening the prosthetic so it's even when applying to the skin. 

13. Leave the mixture to set for as long as possible, the minimum time being and hour.

An Introduction

I'm really excited about having the opportunity to complete this unit as special effects is the route I would like to go down as a career. Previous to starting the unit I had limited experience working with special effects products. Before beginning my degree at solent I completed a 5 week evening course in basic special effects makeup, throughout this course I learnt a small amount about how to create bruising and wounds using wax. However during the first year of my degree I spent a brief amount of time learning about how to use a variety of products in order to create realistic looking cuts, grazes, scars etc. 
After reading the brief for this terms special effects unit I'm expecting it to be challenging but really enjoyable. I think I'm going to enjoy having the freedom to create pieces such as the wound type and the Hybrid and then being able to look back at the final pieces and know that I was able to create them will be a massive sense of accomplishment and achievement as well as feeling one step closer to being ready for my career choice.
Despite this excitement, I am worried about how well I am going to settle in and grasp the various complicated techniques and routines that special effects make-up requires. My biggest fear would be that I would not be able to grasp the techniques or I would not enjoy the course and would then have to rethink which route I want to go down in the future as Special effects is what I have had my heart set on for a long time.